
You know those moments when you want dessert right now, but you do not want to spend hours baking? That is exactly where mini puff pastry desserts save the day.
They look beautiful, taste bakery-level good, and take way less work than most people think. You can turn a simple sheet of puff pastry into crispy, golden little treats filled with creamy chocolate, fruit, cinnamon sugar, or sweet cream cheese in almost no time.
The best part? You do not need fancy baking skills. Even if your kitchen usually feels stressful, this recipe makes dessert feel fun again. The flaky layers puff up into buttery, crispy bites that make every bite feel special.
These mini desserts are perfect for busy weekdays, birthday tables, holiday trays, late-night cravings, or quick snacks when guests suddenly show up. They look impressive, but secretly they are one of the easiest desserts you can make.
And once you learn the small tricks that make puff pastry turn perfectly golden and crispy, you will want to make these again and again.
What Is This Recipe?
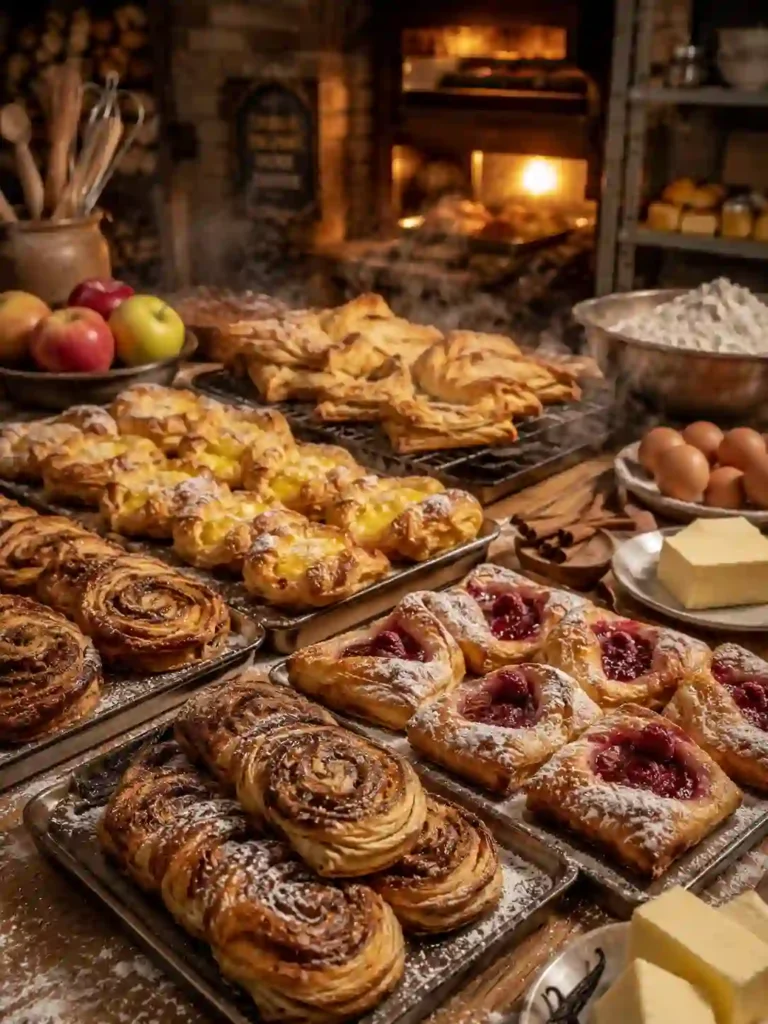
Mini puff pastry desserts are small sweet treats made with ready-made puff pastry dough. Puff pastry is a light, flaky dough that rises into buttery layers when baked. It becomes crispy outside while staying soft and airy inside.
These mini desserts can be filled or topped with many delicious things like chocolate, strawberries, apples, jam, cinnamon sugar, Nutella, cream cheese, or whipped cream. Because they are mini-sized, they bake quickly and are easy to serve.
What makes this recipe special is how simple it is. You can create desserts that look like they came from a fancy bakery without needing difficult baking skills. The crispy golden layers and warm sweet fillings make every bite feel rich and comforting.
They are also easy to customize. You can make them fruity, creamy, chocolatey, or even healthier depending on what you have at home.

Why You Will Love This Recipe
- These mini desserts are incredibly quick to make, especially when using store-bought puff pastry.
- They taste rich and buttery while still feeling light and crispy.
- You can use simple ingredients you already have in your kitchen.
- They are budget-friendly but still look fancy enough for parties.
- Kids and adults both love the crispy texture and sweet fillings.
- You can make many flavor combinations without changing the basic recipe.
- The small size makes portion control much easier.
- They bake fast, which means less waiting and more enjoying.
- Perfect for holidays, brunch tables, tea parties, or late-night cravings.
- You can prepare them ahead of time and bake when needed.
Here’s where most people get this wrong…
They overfill the pastries. Too much filling leaks out, burns, and makes the pastry soggy instead of flaky and crisp.
Ingredients
- 1 sheet puff pastry, thawed properly before using. Frozen pastry that is still hard can crack while unfolding, so let it soften slightly first.
- 1 egg beaten with 1 tablespoon milk for the egg wash. This gives the pastries a shiny golden finish.
- 1/2 cup chocolate chips or chopped chocolate for a rich melted center.
- 1/3 cup strawberry jam, raspberry jam, or apricot jam for fruity sweetness.
- 4 ounces cream cheese softened at room temperature. Soft cream cheese spreads smoothly and creates a creamy filling.
- 2 tablespoons powdered sugar to lightly sweeten the cream cheese mixture.
- 1 teaspoon vanilla extract for warm bakery-style flavor.
- 1 apple diced into very small cubes if you want an apple pie version.
- 1 teaspoon cinnamon for warm sweet flavor.
- 2 tablespoons brown sugar to create a caramel-like filling.
- Fresh berries for topping after baking if desired.
- Powdered sugar for dusting over finished pastries.
- Optional whipped cream or melted chocolate drizzle for serving.
You can also swap ingredients easily. Nutella works beautifully instead of chocolate chips. Greek yogurt can replace cream cheese for a lighter filling. Fresh peaches, blueberries, or bananas also taste amazing inside puff pastry.
How To Make Mini Puff Pastry Desserts
1. Prepare the Puff Pastry
First, preheat your oven to 400°F and line a baking tray with parchment paper so the pastries do not stick. Carefully unfold the thawed puff pastry onto a lightly floured surface. If the dough feels too warm or sticky, place it in the fridge for a few minutes before working with it. Use a sharp knife or pizza cutter to cut the pastry into small squares or rectangles. Try to keep the pieces similar in size so they bake evenly. At this stage, the dough should feel soft but still cool to the touch. If you want extra flaky layers, avoid pressing down too hard while cutting. Gentle handling keeps the pastry airy and light. This small step makes a huge difference because warm pastry loses its crisp flaky texture quickly.
2. Add the Fillings
Now it is time for the fun part. Add a small spoonful of your chosen filling into the center of each pastry square. For chocolate pastries, place a few chocolate chips in the middle. For cream cheese filling, mix softened cream cheese, powdered sugar, and vanilla until smooth and creamy before spooning it onto the pastry. If making apple pastries, mix diced apples with cinnamon and brown sugar first. Keep the filling amount small because too much filling can spill out while baking. Leave space around the edges so you can fold or seal the pastry properly. The fillings should look neat and balanced, not overflowing. As the pastries bake, the filling will warm up, soften, and create a sweet gooey center inside the crispy golden layers.
3. Shape and Seal the Pastries
Fold each pastry into your preferred shape. You can make little triangles, rectangles, twists, or simple pinwheels depending on the style you like. Press the edges gently with a fork to seal them closed. This helps keep the filling inside while baking. If you are making open pastries, slightly fold the edges upward to create a border around the filling. Brush the tops lightly with egg wash for a shiny golden finish. At this point, the pastries should already look neat and bakery-style. The egg wash also helps the tops become beautifully crisp and deep golden in the oven. Sprinkle cinnamon sugar or a few sliced almonds on top for extra texture if desired. Small decorative touches make these mini desserts look extra special.
4. Bake Until Golden and Crispy
Place the tray into the hot oven and bake for about 15 to 20 minutes. Watch carefully during the final few minutes because puff pastry can brown quickly. The pastries are ready when they look puffed, flaky, and deeply golden around the edges. The buttery smell filling the kitchen is the best sign that they are almost done. Let them cool slightly before serving because the filling inside stays very hot at first. Once cooled a little, dust with powdered sugar or drizzle melted chocolate over the top. The final result should be crispy outside, soft inside, and filled with warm creamy sweetness. Every bite should have flaky layers that crack lightly when bitten into.
This small trick makes a huge difference…
Place the filled pastries into the refrigerator for 10 minutes before baking. Cold puff pastry rises higher and becomes much flakier.
Pro Tips
- Always keep puff pastry cold while working with it. Warm pastry becomes sticky and loses its flaky texture.
- Use parchment paper because melted sugar or jam can burn onto baking trays very quickly.
- Do not overload the filling. Small amounts create cleaner pastries with crisp layers.
- Brush only the tops with egg wash. Too much around the edges can stop the pastry from puffing properly.
- Chill filled pastries before baking for extra flaky layers and better shape.
- Bake in a fully preheated oven. High heat is what creates the famous puff pastry rise.
- Use sharp knives when cutting the dough so the edges stay clean and rise evenly.
- Add toppings like sliced almonds, cinnamon sugar, or crushed cookies for extra texture.
- Let pastries cool slightly before eating because the fillings stay extremely hot.
- Dust powdered sugar after cooling so it does not melt immediately.
Common Mistakes To Avoid
- Using puff pastry while still frozen can cause cracking and uneven baking.
- Letting the dough become too warm makes it soft and difficult to handle.
- Adding too much filling often leads to leaking and soggy pastry bottoms.
- Forgetting parchment paper can make cleanup difficult because sugar burns quickly.
- Underbaking leaves the centers doughy instead of flaky and crisp.
- Overbaking creates dark bitter edges instead of buttery golden layers.
- Skipping egg wash results in pale pastries without shine.
- Cutting uneven sizes causes some pastries to bake faster than others.
- Opening the oven too early can stop the pastry from rising fully.
- Using watery fruit fillings may create soggy pastries.
- Placing pastries too close together prevents even airflow.
- Eating immediately from the oven can burn your mouth because fillings stay very hot.
Variations and Customization Ideas
Want extra protein? Add Greek yogurt mixed with honey and fresh berries for a lighter high-protein version.
For a vegan version, use plant-based puff pastry and dairy-free chocolate or coconut cream filling.
Need something faster? Use ready-made pie filling or Nutella for an instant shortcut.
You can also create fun flavor combinations:
- Apple cinnamon for cozy fall flavor.
- Strawberry cream cheese for a bakery-style treat.
- Banana chocolate for a rich dessert.
- Lemon curd with berries for a fresh tangy version.
- Cinnamon sugar twists for a simple sweet snack.
- Peanut butter chocolate for extra richness.
- Mango cream for a tropical dessert.
Now let’s make it even better…
Serve these warm with ice cream or whipped cream and they instantly feel like restaurant desserts.
Serving Ideas
These mini puff pastry desserts are perfect with hot coffee, tea, or cold milk.
Serve them on holiday dessert trays for birthdays, Eid gatherings, or family dinners.
Pack a few into lunch boxes for sweet afternoon snacks.

The Easiest Mini Puff Pastry Desserts Everyone Will Beg You to Make Again
Course: Dessert4
servings30
minutes40
minutes300
kcalIngredients
1 sheet puff pastry, thawed properly before using. Frozen pastry that is still hard can crack while unfolding, so let it soften slightly first.
1 egg beaten with 1 tablespoon milk for the egg wash. This gives the pastries a shiny golden finish.
1/2 cup chocolate chips or chopped chocolate for a rich melted center.
1/3 cup strawberry jam, raspberry jam, or apricot jam for fruity sweetness.
4 ounces cream cheese softened at room temperature. Soft cream cheese spreads smoothly and creates a creamy filling.
2 tablespoons powdered sugar to lightly sweeten the cream cheese mixture.
1 teaspoon vanilla extract for warm bakery-style flavor.
1 apple diced into very small cubes if you want an apple pie version.
1 teaspoon cinnamon for warm sweet flavor.
Fresh berries for topping after baking if desired.
2 tablespoons brown sugar to create a caramel-like filling.
Powdered sugar for dusting over finished pastries.
Optional whipped cream or melted chocolate drizzle for serving.
Directions
- Prepare the Puff Pastry
First, preheat your oven to 400°F and line a baking tray with parchment paper so the pastries do not stick. Carefully unfold the thawed puff pastry onto a lightly floured surface. If the dough feels too warm or sticky, place it in the fridge for a few minutes before working with it. Use a sharp knife or pizza cutter to cut the pastry into small squares or rectangles. Try to keep the pieces similar in size so they bake evenly. At this stage, the dough should feel soft but still cool to the touch. If you want extra flaky layers, avoid pressing down too hard while cutting. Gentle handling keeps the pastry airy and light. This small step makes a huge difference because warm pastry loses its crisp flaky texture quickly. - Add the Fillings
Now it is time for the fun part. Add a small spoonful of your chosen filling into the center of each pastry square. For chocolate pastries, place a few chocolate chips in the middle. For cream cheese filling, mix softened cream cheese, powdered sugar, and vanilla until smooth and creamy before spooning it onto the pastry. If making apple pastries, mix diced apples with cinnamon and brown sugar first. Keep the filling amount small because too much filling can spill out while baking. Leave space around the edges so you can fold or seal the pastry properly. The fillings should look neat and balanced, not overflowing. As the pastries bake, the filling will warm up, soften, and create a sweet gooey center inside the crispy golden layers. - Shape and Seal the Pastries
Fold each pastry into your preferred shape. You can make little triangles, rectangles, twists, or simple pinwheels depending on the style you like. Press the edges gently with a fork to seal them closed. This helps keep the filling inside while baking. If you are making open pastries, slightly fold the edges upward to create a border around the filling. Brush the tops lightly with egg wash for a shiny golden finish. At this point, the pastries should already look neat and bakery-style. The egg wash also helps the tops become beautifully crisp and deep golden in the oven. Sprinkle cinnamon sugar or a few sliced almonds on top for extra texture if desired. Small decorative touches make these mini desserts look extra special. - Bake Until Golden and Crispy
Place the tray into the hot oven and bake for about 15 to 20 minutes. Watch carefully during the final few minutes because puff pastry can brown quickly. The pastries are ready when they look puffed, flaky, and deeply golden around the edges. The buttery smell filling the kitchen is the best sign that they are almost done. Let them cool slightly before serving because the filling inside stays very hot at first. Once cooled a little, dust with powdered sugar or drizzle melted chocolate over the top. The final result should be crispy outside, soft inside, and filled with warm creamy sweetness. Every bite should have flaky layers that crack lightly when bitten into.
Notes
- Always keep puff pastry cold while working with it. Warm pastry becomes sticky and loses its flaky texture.
- Use parchment paper because melted sugar or jam can burn onto baking trays very quickly.