Have you ever wanted a dessert that looks fancy but takes surprisingly little effort? That is exactly why Mini Cannoli Cups are such a favorite.
They have everything people love about classic cannoli desserts without the stress of making traditional pastry shells from scratch. You get crispy golden cups, creamy sweet filling, mini chocolate chips, and rich bakery-style flavor in every bite.
And honestly?
They disappear from dessert tables incredibly fast.
These little treats are perfect for holidays, birthdays, family dinners, bridal showers, or late-night sweet cravings when you want something rich but easy.
The best part is that they look impressive even if you are a beginner in the kitchen. One tray instantly makes your table feel special, cozy, and bakery-worthy.
Once you take one bite of the crispy shell and creamy filling together… it becomes very hard to stop at just one.
What Is This Recipe?
Mini Cannoli Cups are bite-sized desserts inspired by classic Italian cannoli pastries.
Instead of using traditional fried pastry tubes, these easy versions use crispy mini pie crusts or wonton wrappers baked into muffin tins. The cups become golden, crunchy, and perfect for holding creamy ricotta filling.
The filling is soft, sweet, smooth, and packed with mini chocolate chips and vanilla flavor. Some people even add cinnamon or orange zest for extra bakery-style flavor.
What makes these special is the mix of textures. The crispy shell and creamy center create the perfect dessert bite every single time.
They look elegant, but they are much easier than traditional cannoli recipes.
Why You Will Love This Recipe
- Quick and easy to make
These mini desserts come together much faster than traditional cannoli shells. - Perfect party dessert
Their small size makes them easy to serve at birthdays, holidays, and gatherings. - Bakery-style flavor at home
You get rich creamy cannoli flavor without expensive bakery prices. - Beginner-friendly recipe
No complicated frying or pastry skills are needed. - Great make-ahead option
The filling can be prepared ahead of time for easy assembly later. - Crispy and creamy texture
Every bite has the perfect balance of crunch and smooth filling. - Easy to customize
You can change toppings, chocolate chips, or flavors easily. - Kid-friendly dessert
Children love decorating the cups with sprinkles and chocolate chips.
Here’s where most people get this wrong…
They fill the cups too early and the shells lose their crispy texture.
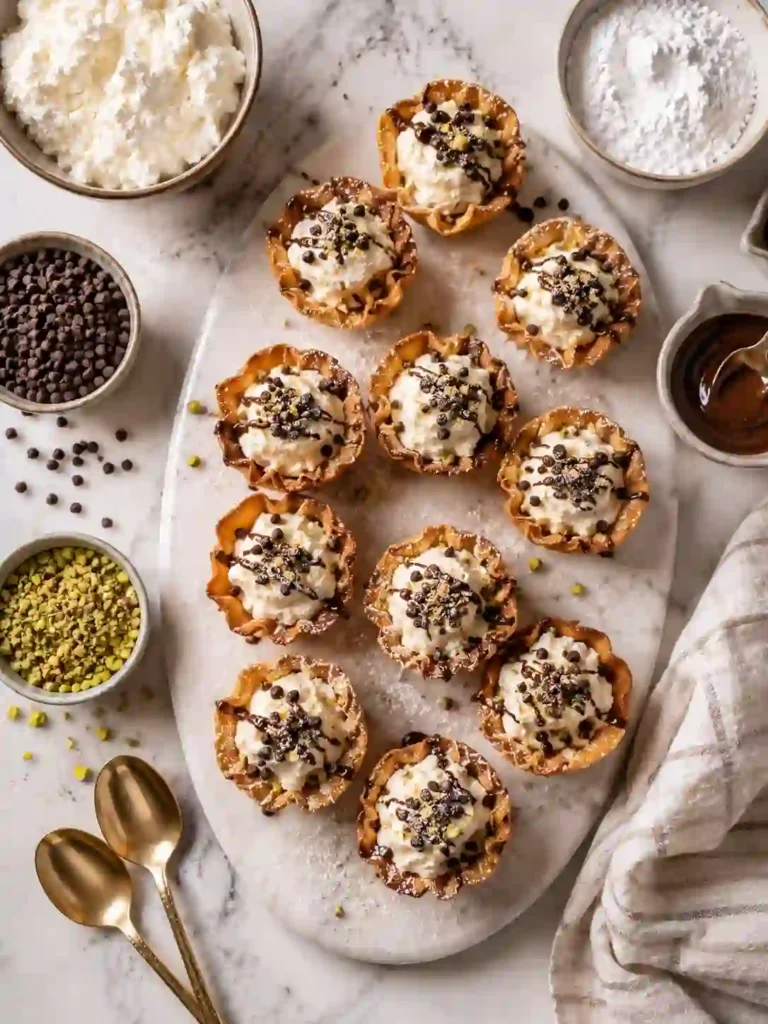
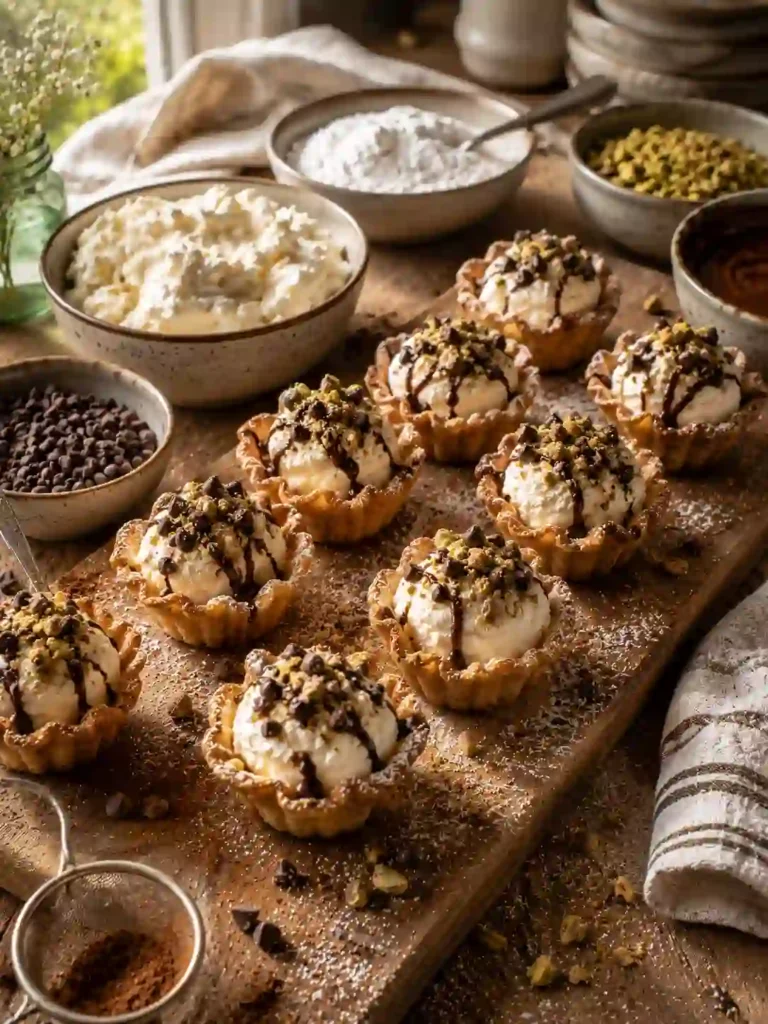
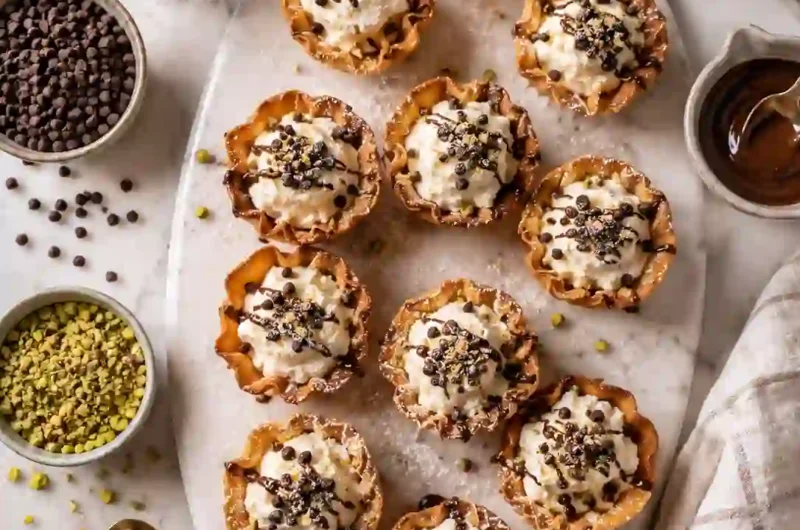
Ingredients
- 24 mini phyllo shells or wonton wrappers
These create the crispy base for the dessert. Phyllo shells are the easiest shortcut option. - 2 cups ricotta cheese
Whole milk ricotta gives the creamiest and richest filling. Drain extra liquid before using. - 1 cup mascarpone cheese
Makes the filling extra smooth and luxurious like bakery cannoli cream. - ¾ cup powdered sugar
Sweetens the filling while keeping it soft and silky. - 1 teaspoon vanilla extract
Adds warm sweet flavor that makes the filling taste homemade. - ½ teaspoon cinnamon
Optional, but it adds cozy Italian bakery flavor. - ½ cup mini chocolate chips
Adds texture and sweetness throughout the creamy filling. - Powdered sugar for topping
Makes the finished cups look elegant and bakery-style. - Crushed pistachios or chocolate drizzle
Optional toppings that add extra flavor and crunch.
Helpful tip:
If your ricotta looks watery, let it drain in a fine strainer for about 30 minutes before mixing the filling.
How To Make Mini Cannoli Cups
Step 1: Prepare the Crispy Cups
Start by preheating your oven to 350°F. If using wonton wrappers, gently press them into a greased mini muffin tin to create little cup shapes. Bake them for about 8 to 10 minutes until golden, crispy, and lightly browned around the edges. The kitchen will already smell warm and buttery during this step. Watch carefully because the thin wrappers crisp quickly. If using store-bought phyllo shells, simply place them onto a baking tray and warm them lightly in the oven for a few minutes. Let the cups cool completely before filling them. This helps them stay crunchy longer. The crispy shell is one of the best parts of this dessert, so do not rush this cooling step.
Step 2: Make the Cannoli Filling
In a large mixing bowl, combine the ricotta cheese, mascarpone cheese, powdered sugar, vanilla extract, and cinnamon. Beat everything together until smooth, thick, creamy, and fluffy. The filling should look silky without lumps. Fold in the mini chocolate chips gently so they stay evenly spread throughout the mixture. If you want extra bakery-style flavor, add a little orange zest for freshness. The filling should feel rich, creamy, and soft enough to pipe easily into the cups later. Place the bowl into the refrigerator for about 20 minutes to chill slightly. This small trick makes a huge difference because cold filling holds its shape much better when piped into the shells.
Step 3: Fill the Mini Cups
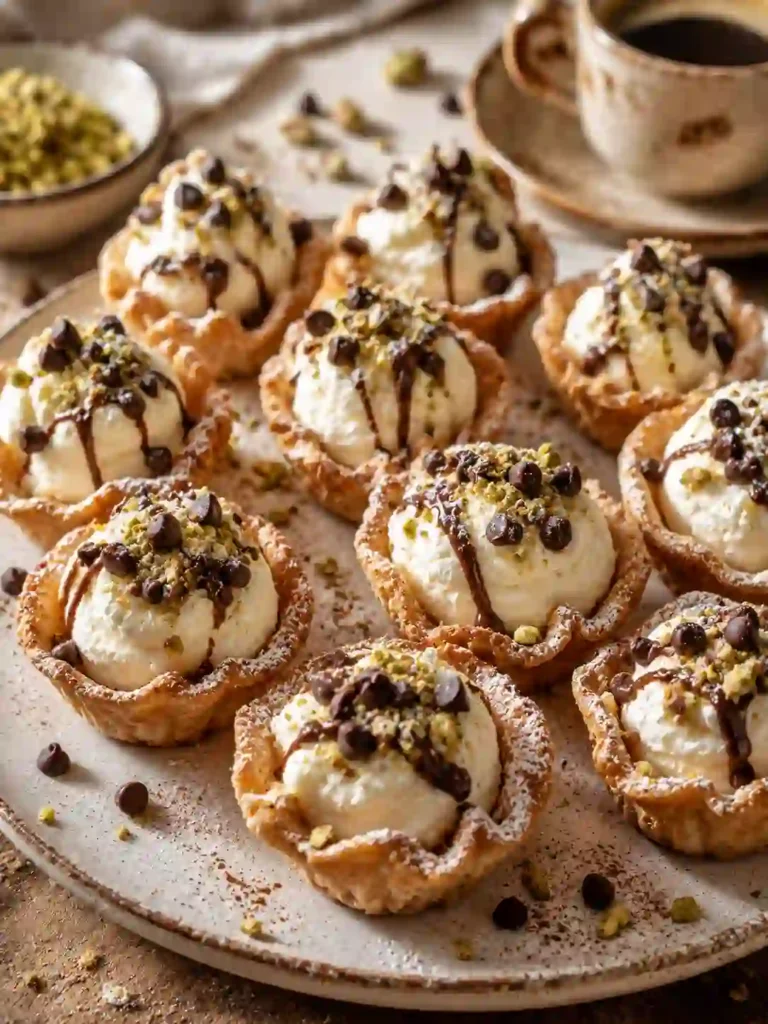
Transfer the chilled filling into a piping bag or zip bag with the corner cut off. Carefully pipe the creamy filling into each crispy cup until slightly overflowing at the top. The filling should look smooth, fluffy, and rich inside the golden shells. Sprinkle extra mini chocolate chips, crushed pistachios, or powdered sugar over the tops for beautiful bakery-style presentation. You can also drizzle melted chocolate over the cups for extra richness. The contrast between the creamy white filling and crunchy golden shell already looks incredibly tempting. Try not to overfill the cups too heavily because the shells may soften faster. Serve soon after filling for the best crispy texture.
Step 4: Chill Slightly and Serve
Place the finished Mini Cannoli Cups into the refrigerator for about 10 to 15 minutes before serving. This helps the filling become colder, thicker, and even creamier. The shells stay crispy while the filling turns soft and rich inside. Arrange the cups on a dessert platter with extra powdered sugar dusted lightly over the top. They look elegant enough for weddings, parties, holidays, and family dinners. Every bite should taste crispy, creamy, sweet, and slightly chocolatey all at once. The filling melts smoothly while the crunchy shell adds the perfect contrast. One tray usually disappears much faster than expected because they are so easy to grab and eat.
Pro Tips
- Drain ricotta cheese well because watery filling can make the shells soggy quickly.
- Chill the filling before piping so it stays thick and fluffy inside the cups.
- Fill the shells shortly before serving for maximum crunch.
- Use mascarpone cheese for extra smooth bakery-style texture.
- Dust powdered sugar right before serving so it looks fresh and pretty.
- Add orange zest for fresh authentic Italian bakery flavor.
- Use mini chocolate chips because large chips can overpower the small cups.
- Store shells and filling separately until serving time.
- Bake wonton wrappers until golden but not dark brown to avoid bitterness.
- Pipe the filling neatly for elegant presentation and cleaner dessert trays.
Common Mistakes To Avoid
- Filling the cups too early makes the shells soft and soggy.
- Using watery ricotta creates runny filling that does not hold shape well.
- Overbaking the cups can make them dry and bitter tasting.
- Skipping chilling time weakens the creamy texture.
- Overmixing the filling may make it too loose.
- Using low-fat cheeses reduces the rich bakery-style flavor.
- Overfilling the cups can break delicate shells easily.
- Storing filled cups uncovered dries out the filling quickly.
- Forgetting toppings makes the dessert look less exciting visually.
- Using warm shells with cold filling creates steam and softens the crust.
- Adding too much sugar can overpower the ricotta flavor completely.
- Not greasing muffin tins may cause wonton cups to stick badly.
Variations & Customization Ideas
Chocolate Cannoli Cups
Add cocoa powder into the filling for richer chocolate flavor.
Strawberry Version
Top each cup with fresh strawberries for fruity sweetness.
High Protein Version
Use Greek yogurt mixed with ricotta for extra protein.
Holiday Style
Add red and green sprinkles for Christmas dessert trays.
Vegan Version
Use dairy-free cream cheese and coconut whipped topping.
Quick Shortcut Version
Use store-bought cannoli dip to save preparation time.
Now let’s make it even better…
Try dipping the cup edges into melted chocolate before filling them.
Serving Ideas
- Serve on holiday dessert trays.
- Pair with espresso or cappuccino.
- Add fresh berries for color and freshness.
- Serve during birthdays and bridal showers.
- Enjoy as a late-night sweet snack.
- Add caramel drizzle for extra richness.
Storage & Reheating
Store the filling covered in the refrigerator for up to 4 days.
Keep empty shells in an airtight container at room temperature to maintain crispness.
Filled cups are best eaten within several hours for the crunchiest texture.
These desserts do not need reheating because they are served chilled or at room temperature.
Nutrition Facts (Approximate Per Cup)
- Calories: 120
- Carbohydrates: 10g
- Protein: 3g
- Fat: 7g
- Sugar: 6g
- Fiber: 1g
Quick Summary
- Easy Italian-inspired dessert
- Crispy shell with creamy filling
- Perfect for parties and holidays
- Beginner-friendly recipe
- Bakery-style flavor at home
- Best served freshly filled
When To Eat This
Mini Cannoli Cups fit almost every dessert moment.
They are perfect for birthday parties, bridal showers, holiday dessert tables, family dinners, movie nights, and sweet snack cravings. They also work beautifully when you need a fancy-looking dessert without spending hours baking.
Need a quick dessert for guests?
These little cups feel elegant and impressive instantly.
Want something rich after dinner?
The creamy filling and crispy shell feel incredibly satisfying.
Crispy Mini Cannoli Cups Filled with Sweet Creamy Perfection
4
servings30
minutes40
minutes300
kcalIngredients
24 mini phyllo shells or wonton wrappers
These create the crispy base for the dessert. Phyllo shells are the easiest shortcut option.2 cups ricotta cheese
Whole milk ricotta gives the creamiest and richest filling. Drain extra liquid before using.1 cup mascarpone cheese
Makes the filling extra smooth and luxurious like bakery cannoli cream.¾ cup powdered sugar
Sweetens the filling while keeping it soft and silky.1 teaspoon vanilla extract
Adds warm sweet flavor that makes the filling taste homemade.½ teaspoon cinnamon
Optional, but it adds cozy Italian bakery flavor.½ cup mini chocolate chips
Adds texture and sweetness throughout the creamy filling.Powdered sugar for topping
Makes the finished cups look elegant and bakery-style.Crushed pistachios or chocolate drizzle
Optional toppings that add extra flavor and crunch.
Directions
- Prepare the Crispy Cups
Start by preheating your oven to 350°F. If using wonton wrappers, gently press them into a greased mini muffin tin to create little cup shapes. Bake them for about 8 to 10 minutes until golden, crispy, and lightly browned around the edges. The kitchen will already smell warm and buttery during this step. Watch carefully because the thin wrappers crisp quickly. If using store-bought phyllo shells, simply place them onto a baking tray and warm them lightly in the oven for a few minutes. Let the cups cool completely before filling them. This helps them stay crunchy longer. The crispy shell is one of the best parts of this dessert, so do not rush this cooling step. - Make the Cannoli Filling
In a large mixing bowl, combine the ricotta cheese, mascarpone cheese, powdered sugar, vanilla extract, and cinnamon. Beat everything together until smooth, thick, creamy, and fluffy. The filling should look silky without lumps. Fold in the mini chocolate chips gently so they stay evenly spread throughout the mixture. If you want extra bakery-style flavor, add a little orange zest for freshness. The filling should feel rich, creamy, and soft enough to pipe easily into the cups later. Place the bowl into the refrigerator for about 20 minutes to chill slightly. This small trick makes a huge difference because cold filling holds its shape much better when piped into the shells. - Fill the Mini Cups
Transfer the chilled filling into a piping bag or zip bag with the corner cut off. Carefully pipe the creamy filling into each crispy cup until slightly overflowing at the top. The filling should look smooth, fluffy, and rich inside the golden shells. Sprinkle extra mini chocolate chips, crushed pistachios, or powdered sugar over the tops for beautiful bakery-style presentation. You can also drizzle melted chocolate over the cups for extra richness. The contrast between the creamy white filling and crunchy golden shell already looks incredibly tempting. Try not to overfill the cups too heavily because the shells may soften faster. Serve soon after filling for the best crispy texture. - Chill Slightly and Serve
Place the finished Mini Cannoli Cups into the refrigerator for about 10 to 15 minutes before serving. This helps the filling become colder, thicker, and even creamier. The shells stay crispy while the filling turns soft and rich inside. Arrange the cups on a dessert platter with extra powdered sugar dusted lightly over the top. They look elegant enough for weddings, parties, holidays, and family dinners. Every bite should taste crispy, creamy, sweet, and slightly chocolatey all at once. The filling melts smoothly while the crunchy shell adds the perfect contrast. One tray usually disappears much faster than expected because they are so easy to grab and eat.
Notes
- Drain ricotta cheese well because watery filling can make the shells soggy quickly.
- Fill the shells shortly before serving for maximum crunch.