
Do you ever want a chocolate dessert that feels light but still rich and creamy? Something that melts in your mouth but doesn’t feel heavy like a regular cake?
You’re not alone.
Many people try making mousse cakes, but they turn out too dense, too runny, or just not smooth enough.
But here’s the good part…
This chocolate mousse cake recipe is simple, easy, and gives you that perfect soft, airy, creamy texture every single time.
No stress. No confusion. Just pure chocolate happiness in every bite.
What Is This Recipe?
Chocolate mousse cake is a soft dessert made with layers of light chocolate mousse and a soft cake base.
The mousse is creamy, airy, and smooth, while the cake layer gives it a little structure.
What makes this recipe special is the balance. It is not too heavy and not too light. Every bite feels rich but still soft and fluffy.
Why You Will Love This Recipe
- Super creamy and melts in your mouth
- Light texture but still rich in flavor
- Easy steps for beginners
- Uses simple and affordable ingredients
- Perfect for parties and special days
- Can be made ahead of time
- Looks fancy but is easy to make
Here’s where most people get this wrong… They rush the mousse and don’t let it set properly.
Ingredients
- 1 cup all-purpose flour – gives structure to the base layer
- 1/2 cup sugar – adds sweetness without making it too heavy
- 1/3 cup cocoa powder – use good quality for rich chocolate taste
- 1 teaspoon baking powder – helps the cake rise
- 1/2 teaspoon baking soda – keeps it soft and fluffy
- 1/4 teaspoon salt – balances flavor
- 1 egg – adds richness and helps bind everything
- 1/2 cup milk – keeps the cake soft (you can use almond milk)
- 1/4 cup oil – makes the cake moist and tender
- 1 teaspoon vanilla extract – adds warmth to the flavor
For mousse:
- 200g dark chocolate – melt it for a smooth base
- 1 cup heavy cream – gives that light, airy texture
- 2 tablespoons sugar – optional, adjust to taste
- 1 teaspoon vanilla extract
Tip: Use chilled cream for better whipping results.
How To Make (Step-by-Step)
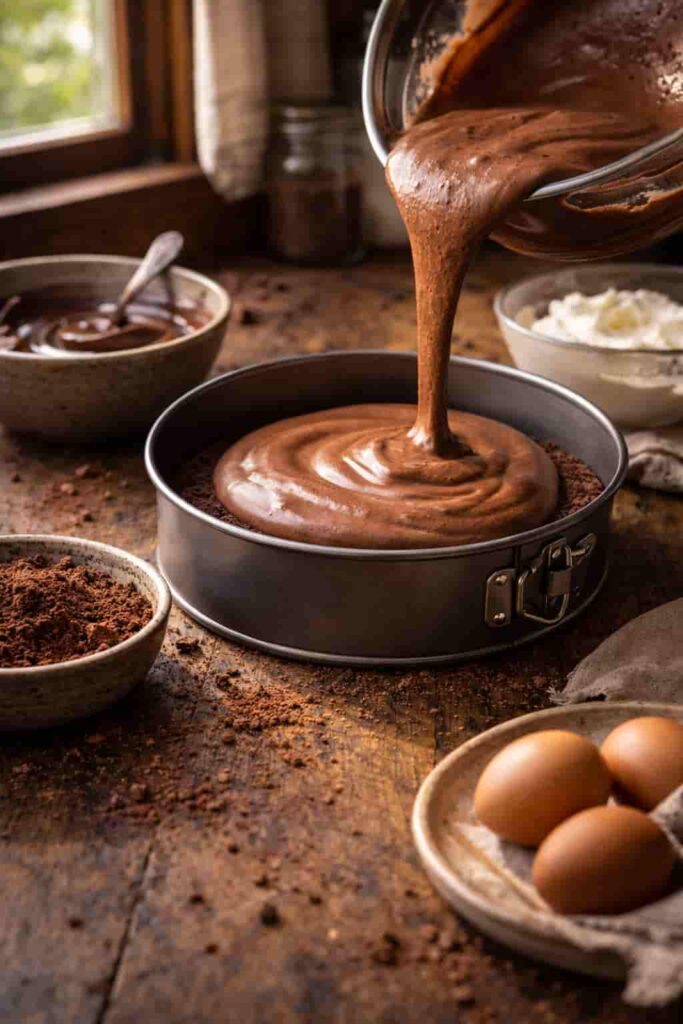
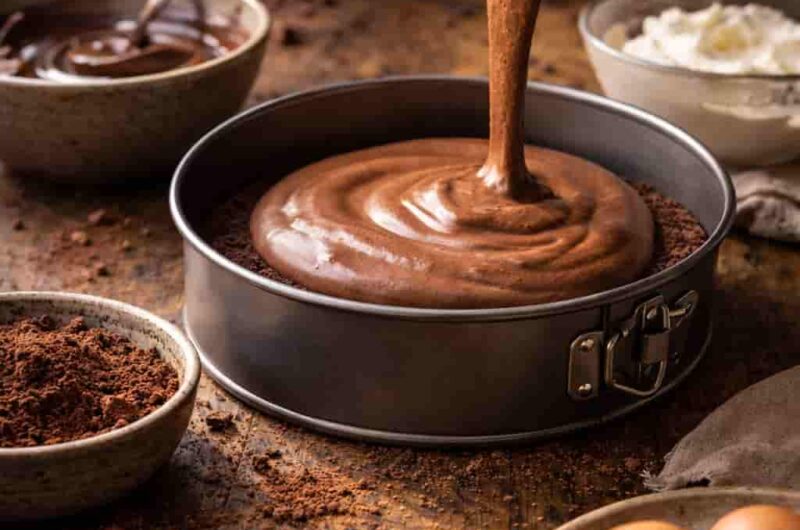
1. Make the Cake Base
Start by preheating your oven to 180°C. Grease and line a cake pan. In a bowl, mix flour, cocoa powder, baking powder, baking soda, sugar, and salt. Stir well so everything is combined. In another bowl, whisk egg, milk, oil, and vanilla until smooth and slightly creamy. Now slowly mix the wet ingredients into the dry ingredients. Stir gently until the batter becomes smooth and slightly thick. Do not overmix, as this can make the cake dense. Pour the batter into the pan and spread it evenly. Bake for about 20–25 minutes until a toothpick comes out clean. The top should feel soft but not sticky. Let it cool completely before adding mousse.
2. Prepare the Chocolate Mousse
Take your dark chocolate and melt it slowly using a double boiler or microwave in short bursts. Stir until smooth and glossy. Let it cool slightly so it is not too hot. In another bowl, whip chilled heavy cream until soft peaks form. It should look light, fluffy, and hold shape but still be smooth. Now gently fold the melted chocolate into the whipped cream. Do this slowly and carefully so you don’t lose the air. Add sugar and vanilla if needed. The mousse should look smooth, creamy, and slightly thick. This small trick makes a huge difference… folding gently keeps the mousse light and airy.
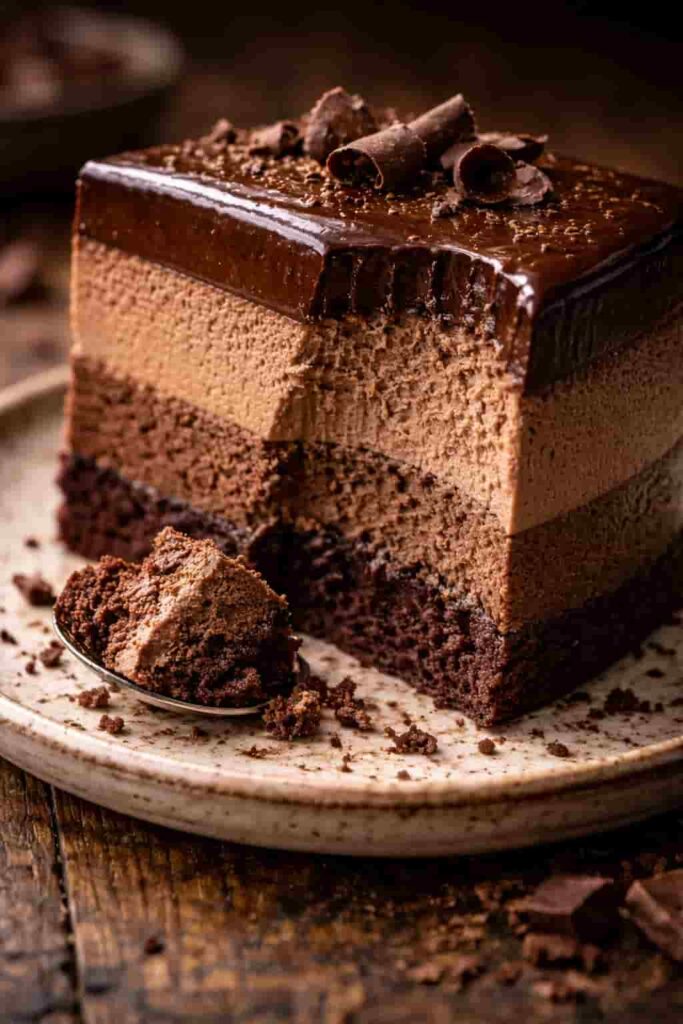
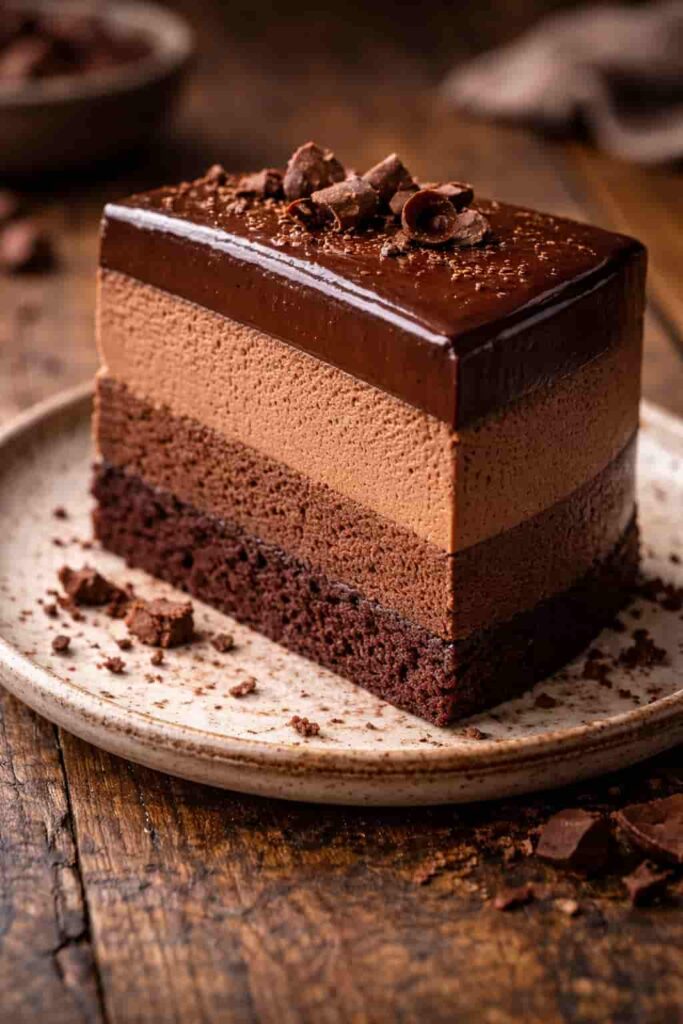
3. Assemble the Cake
Place the cooled cake base on a serving plate. Pour the mousse on top and spread it evenly. Use a spatula to smooth the surface. Tap the pan lightly to remove air bubbles. Cover and place it in the fridge for at least 4–6 hours, or overnight for best results. As it chills, the mousse will set into a soft, creamy layer. Once ready, slice carefully using a clean knife. You will see beautiful layers that look soft and rich.
Pro Tips
- Always use cold cream for whipping so it forms soft peaks easily and holds structure.
- Do not add hot chocolate directly to cream, as it can melt the texture and make it runny.
- Fold gently instead of mixing fast to keep the mousse light and airy.
- Let the cake base cool fully before adding mousse to avoid melting.
- Use a sharp knife for clean slices and wipe between cuts.
- Chill the cake overnight for best texture and flavor.
- Adjust sugar based on your chocolate sweetness level.
- Use high-quality chocolate for a richer taste.
- Line your pan for easy removal and clean edges.
Common Mistakes To Avoid
Using warm cream will stop it from whipping properly. Overwhipping cream can make it grainy. Mixing chocolate too quickly can deflate the mousse. Not letting the cake cool can ruin the layers. Skipping chill time results in a soft mess. Using low-quality chocolate affects taste. Adding too much sugar makes it heavy. Not folding properly removes air. Cutting too early ruins the shape. Uneven layers can make it unstable. Not measuring ingredients correctly changes texture.
Variations / Customization Ideas
Now let’s make it even better…
- Make a vegan version using coconut cream and dairy-free chocolate
- Add a fruit layer like strawberries for freshness
- Make a high-protein version by adding protein powder
- Turn it into mini cups for quick desserts
- Add a biscuit base instead of cake for crunch
Serving Ideas
Serve chilled for best taste. Add chocolate shavings on top for extra flavor. You can also serve with berries or a drizzle of chocolate sauce. Perfect for birthdays, dinners, or weekend treats.
Storage & Reheating
Store in the fridge for up to 4 days in an airtight container. Do not keep at room temperature for long. No reheating needed—serve cold for best texture.
Nutrition Facts (Approximate)
- Calories: 320 per slice
- Carbs: 30g
- Fat: 20g
- Protein: 5g
Quick Summary
- Easy chocolate mousse cake recipe
- Creamy, soft, and rich texture
- Simple ingredients and steps
- Perfect for any occasion
When To Eat This
This dessert is perfect after dinner when you want something sweet but not too heavy. It’s great for celebrations, date nights, or when you just want to treat yourself. Also perfect for late-night cravings when you need something creamy and comforting.
Chocolate Mousse Cake Recipe
Course: Cakes4
servings30
minutes40
minutes300
kcalIngredients
1 cup all-purpose flour – gives structure to the base layer
1/2 cup sugar – adds sweetness without making it too heavy
1/3 cup cocoa powder – use good quality for rich chocolate taste1 teaspoon baking powder – helps the cake rise
1/2 teaspoon baking soda – keeps it soft and fluffy
1/4 teaspoon salt – balances flavor
1 egg – adds richness and helps bind everything
1/2 cup milk – keeps the cake soft (you can use almond milk)
1/4 cup oil – makes the cake moist and tender
1 teaspoon vanilla extract – adds warmth to the flavor
For mousse:
200g dark chocolate – melt it for a smooth base1 cup heavy cream – gives that light, airy texture
2 tablespoons sugar – optional, adjust to taste
1 teaspoon vanilla extract
Directions
- Make the Cake Base
Start by preheating your oven to 180°C. Grease and line a cake pan. In a bowl, mix flour, cocoa powder, baking powder, baking soda, sugar, and salt. Stir well so everything is combined. In another bowl, whisk egg, milk, oil, and vanilla until smooth and slightly creamy. Now slowly mix the wet ingredients into the dry ingredients. Stir gently until the batter becomes smooth and slightly thick. Do not overmix, as this can make the cake dense. Pour the batter into the pan and spread it evenly. Bake for about 20–25 minutes until a toothpick comes out clean. The top should feel soft but not sticky. Let it cool completely before adding mousse. - Prepare the Chocolate Mousse
Take your dark chocolate and melt it slowly using a double boiler or microwave in short bursts. Stir until smooth and glossy. Let it cool slightly so it is not too hot. In another bowl, whip chilled heavy cream until soft peaks form. It should look light, fluffy, and hold shape but still be smooth. Now gently fold the melted chocolate into the whipped cream. Do this slowly and carefully so you don’t lose the air. Add sugar and vanilla if needed. The mousse should look smooth, creamy, and slightly thick. This small trick makes a huge difference… folding gently keeps the mousse light and airy. - Assemble the Cake
Place the cooled cake base on a serving plate. Pour the mousse on top and spread it evenly. Use a spatula to smooth the surface. Tap the pan lightly to remove air bubbles. Cover and place it in the fridge for at least 4–6 hours, or overnight for best results. As it chills, the mousse will set into a soft, creamy layer. Once ready, slice carefully using a clean knife. You will see beautiful layers that look soft and rich.
Notes
- Use chilled cream for better whipping results.
- Adjust sugar based on your chocolate sweetness level.
