You know those days when you want something sweet and cozy but do not want to turn on the oven? That is exactly where these no bake pumpkin balls come in. They are soft, creamy, sweet, and full of warm pumpkin spice flavor that tastes like fall in every bite.
A lot of desserts take too much time, create a huge mess, or need fancy baking skills. Sometimes you just want something easy that still feels homemade and special. That can be hard to find.
But this recipe changes everything.
These pumpkin balls are quick to make, fun to roll together, and perfect for busy afternoons, snack cravings, holiday parties, or late-night sweet tooth moments. They have a smooth creamy center with rich pumpkin flavor and just the right amount of sweetness.
The best part? No oven. No stress. No complicated steps.
Once you try one soft pumpkin ball covered in cinnamon, crushed cookies, or chocolate, you will want to keep a batch in your fridge all season long.
What Is This Recipe?
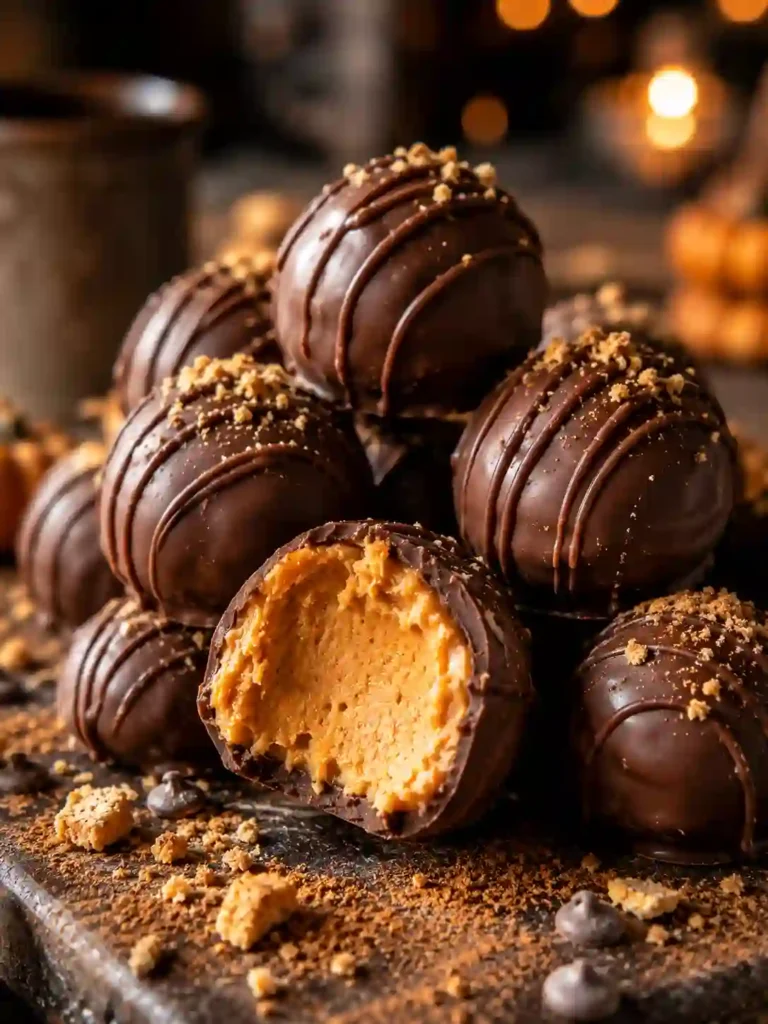
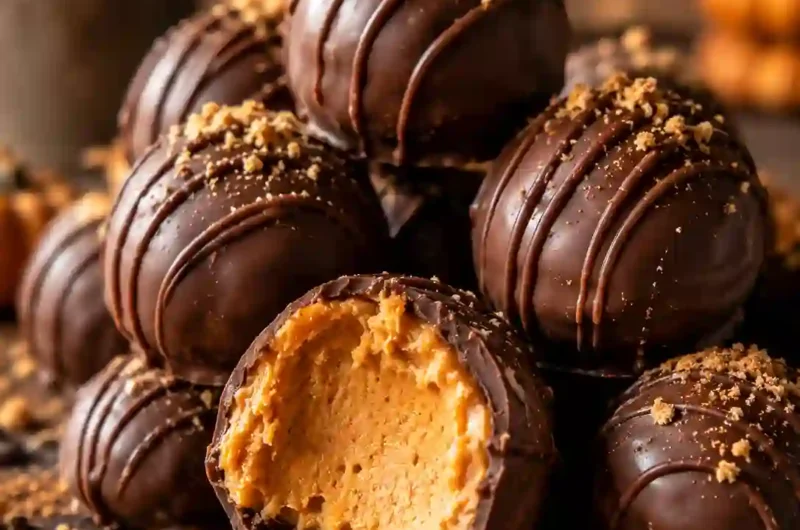
No bake pumpkin balls are small bite-sized dessert treats made with pumpkin puree, crushed cookies or graham crackers, cream cheese, pumpkin spice, and sweet ingredients mixed together into a soft dough.
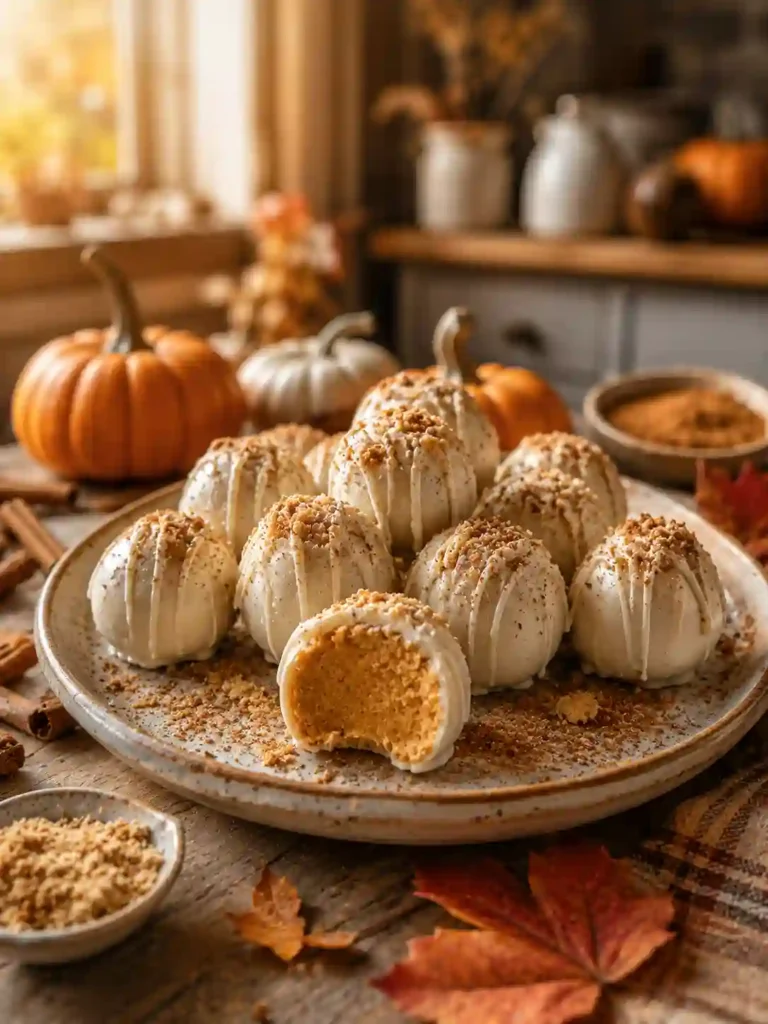
The mixture is rolled into little balls and chilled until firm. Some people coat them in chocolate while others roll them in cookie crumbs, cinnamon sugar, or nuts.
What makes this recipe special is how easy and flexible it is. You can make them in minutes with simple pantry ingredients, and they taste like tiny pumpkin cheesecake bites.
They are creamy, rich, soft, and full of cozy fall flavor without any baking.
Why You Will Love This Recipe
- These pumpkin balls take very little time, which makes them perfect for busy weekdays or quick dessert cravings.
- You do not need an oven, so your kitchen stays cool and cleanup stays easy.
- The creamy pumpkin filling tastes rich and comforting like pumpkin pie and cheesecake combined.
- They are budget-friendly because the ingredients are simple and easy to find.
- You can make them ahead for parties, holidays, or meal prep snacks.
- Kids love helping roll the pumpkin balls, which makes this recipe fun for families.
- They store well in the fridge, so you always have a quick sweet treat ready.
- You can easily make healthier or high-protein versions with small ingredient swaps.
- The flavor gets even better after chilling overnight.
Here’s where most people get this wrong…
Many people add too much pumpkin puree. That makes the mixture wet and sticky instead of soft and creamy.
Ingredients
- 1 cup pumpkin puree for rich pumpkin flavor and creamy texture
- 8 ounces cream cheese softened for smooth cheesecake-like filling
- 2 cups crushed graham crackers or vanilla cookies
- 1 teaspoon pumpkin pie spice for warm cozy flavor
- 1 teaspoon vanilla extract for sweetness and depth
- 1 1/2 cups powdered sugar
- 1 cup white chocolate chips melted for coating
- 1 tablespoon coconut oil to help chocolate melt smoothly
- Optional crushed pecans, cinnamon sugar, or cookie crumbs for topping
Pumpkin puree is the star ingredient here, but make sure you use pure pumpkin and not pumpkin pie filling because pie filling already contains sugar and spices.
Softened cream cheese mixes much more smoothly and creates a creamy filling without lumps. If you want a slightly healthier option, Greek yogurt cream cheese also works well.
Crushed graham crackers help absorb extra moisture while adding texture and flavor. Vanilla wafers or ginger snaps are also delicious swaps.
White chocolate gives these pumpkin balls a sweet bakery-style finish, but dark chocolate works great too if you prefer a richer taste.
How To Make No Bake Pumpkin Balls
1. Make the Pumpkin Mixture
Start by placing the softened cream cheese into a large mixing bowl. Beat it gently until smooth and creamy with no lumps left. Add the pumpkin puree, vanilla extract, pumpkin pie spice, and powdered sugar. Stir slowly until everything becomes thick, smooth, and creamy. The color should look light orange and smell warm and sweet like pumpkin pie filling. Now add the crushed graham crackers little by little while mixing. The mixture should become soft but easy to shape with your hands. If it feels too sticky, add a little more cracker crumbs. This small trick makes a huge difference because the right texture helps the pumpkin balls stay firm after chilling.
2. Chill the Mixture
Cover the bowl with plastic wrap and place it into the refrigerator for about 30 to 45 minutes. This step is important because cold filling becomes easier to roll into smooth balls. When the mixture is chilled properly, it feels thicker and less sticky. While waiting, prepare a baking tray lined with parchment paper. You can also melt the chocolate during this time. The chilled mixture should feel soft and creamy but still hold its shape when scooped. If the filling still feels sticky after chilling, add another spoon of graham cracker crumbs. Do not skip this chilling step because warm filling can become messy very quickly.
3. Roll the Pumpkin Balls
Use a small cookie scoop or spoon to scoop equal portions of the chilled pumpkin mixture. Roll each piece gently between your hands until smooth and round. Try not to squeeze too hard because that can make the balls uneven or sticky. Place each pumpkin ball onto the lined tray with a little space between them. The texture should feel soft, creamy, and slightly chewy. Once all the balls are rolled, place the tray back into the refrigerator for another 20 minutes. This helps them stay firm during the chocolate coating step.
4. Coat and Decorate
Melt the white chocolate chips with coconut oil until smooth and glossy. Dip each chilled pumpkin ball into the melted chocolate using a fork or spoon. Let the extra chocolate drip off slowly before placing the ball back onto the tray. Sprinkle crushed cookies, cinnamon sugar, or chopped nuts on top before the chocolate hardens. The finished pumpkin balls should look smooth, creamy, and bakery-style with a beautiful shiny coating. Chill again until the chocolate sets fully. Once cold, the center becomes soft and creamy while the outside stays slightly firm and sweet.
Pro Tips
- Chill the mixture before rolling because cold filling is easier to shape into smooth balls.
- Use full-fat cream cheese for the richest and creamiest texture.
- Add graham cracker crumbs slowly so the mixture does not become too dry.
- Melt chocolate slowly to avoid thick clumpy coating.
- Use a cookie scoop for evenly sized pumpkin balls.
- Keep your hands slightly cold while rolling to prevent sticking.
- Add extra pumpkin spice for deeper fall flavor.
- Freeze the pumpkin balls for 10 minutes before dipping into chocolate for cleaner coating.
- Store them in airtight containers so they stay soft and fresh.
- Let chilled pumpkin balls sit for a few minutes before serving for the best creamy texture.
Common Mistakes To Avoid
- Adding too much pumpkin puree creates wet sticky filling.
- Using cold cream cheese causes lumpy texture.
- Skipping the chilling step makes rolling difficult.
- Overheating the chocolate can make it thick and grainy.
- Using too little cracker crumbs can prevent the balls from holding shape.
- Rolling the mixture too roughly creates cracks.
- Leaving the balls at room temperature too long makes them soft.
- Using watery pumpkin puree changes the texture.
- Forgetting parchment paper can cause sticking.
- Coating warm pumpkin balls in chocolate creates messy coating.
- Storing uncovered pumpkin balls dries them out.
- Adding too much powdered sugar can overpower the pumpkin flavor.
Variations And Customization Ideas
Want to make these pumpkin balls even more exciting?
- Add protein powder for a high-protein snack version.
- Use dairy-free cream cheese and vegan chocolate for a vegan option.
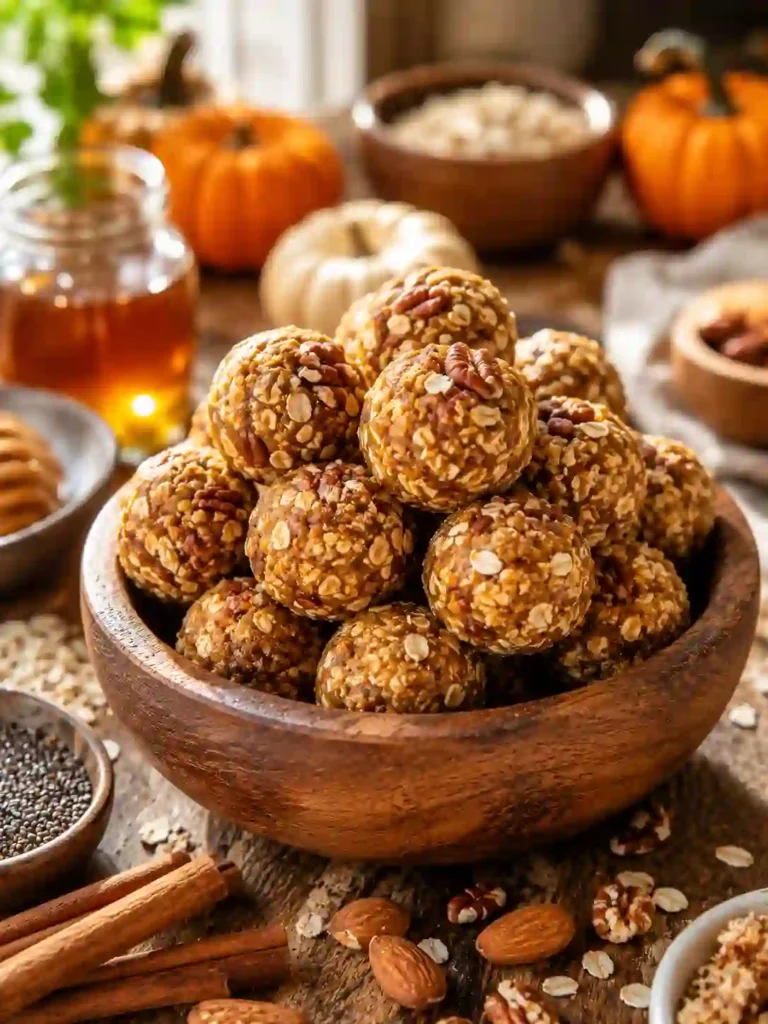
- Roll the balls in crushed pecans for extra crunch.
- Add mini chocolate chips inside the filling.
- Use ginger snap cookies instead of graham crackers for stronger spice flavor.
- Drizzle caramel sauce over the top for extra sweetness.
- Add a little maple syrup for richer fall flavor.
- Make mini pumpkin balls for party platters.
Now let’s make it even better…
Try freezing a few pumpkin balls and eating them slightly frozen. They taste like creamy pumpkin cheesecake truffles.
Serving Ideas
- Serve with hot coffee or chai tea.
- Add them to holiday dessert trays.
- Pack them into lunch boxes for sweet snacks.
- Enjoy after dinner when cravings hit.
- Serve at baby showers, fall parties, or Thanksgiving gatherings.
- Pair with vanilla ice cream for a fun dessert plate.
Storage And Reheating
Store pumpkin balls in an airtight container in the refrigerator for up to 5 days.
For longer storage, freeze them for up to 2 months. Place parchment paper between layers so they do not stick together.
These are best served chilled, so reheating is usually not needed. If frozen, let them sit at room temperature for about 10 minutes before eating.
Nutrition Facts
Approximate per pumpkin ball:
- Calories: 140
- Carbohydrates: 18g
- Protein: 2g
- Fat: 7g
- Sugar: 12g
- Fiber: 1g
Quick Summary
- Easy no bake dessert recipe
- Soft creamy pumpkin filling
- Perfect for fall cravings
- Beginner-friendly and quick
- Great for parties and snacks
- Easy to customize with toppings
- Stores well in the fridge
When To Eat This
These pumpkin balls fit almost every cozy moment.
Need a quick sweet snack during busy mornings? Grab one from the fridge.
Want a small dessert after dinner without baking? These are perfect.
Craving something sweet during movie night or late-night hunger? Pumpkin balls hit the spot fast.
Need a quick holiday dessert for guests? Make a batch ahead of time.
They also work great as post-workout treats when you add protein powder.
Soft, creamy, sweet, and packed with pumpkin spice flavor, these little dessert bites make every day feel a little more cozy.
The Best No Bake Pumpkin Balls Recipe for Quick Sweet Cravings
Course: Cakes4
servings30
minutes40
minutes300
kcalIngredients
1 cup pumpkin puree for rich pumpkin flavor and creamy texture
8 ounces cream cheese softened for smooth cheesecake-like filling
2 cups crushed graham crackers or vanilla cookies
1 teaspoon pumpkin pie spice for warm cozy flavor
1 teaspoon vanilla extract for sweetness and depth
1 1/2 cups powdered sugar
1 cup white chocolate chips melted for coating
1 tablespoon coconut oil to help chocolate melt smoothly
Optional crushed pecans, cinnamon sugar, or cookie crumbs for topping
Directions
- Make the Pumpkin Mixture
Start by placing the softened cream cheese into a large mixing bowl. Beat it gently until smooth and creamy with no lumps left. Add the pumpkin puree, vanilla extract, pumpkin pie spice, and powdered sugar. Stir slowly until everything becomes thick, smooth, and creamy. The color should look light orange and smell warm and sweet like pumpkin pie filling. Now add the crushed graham crackers little by little while mixing. The mixture should become soft but easy to shape with your hands. If it feels too sticky, add a little more cracker crumbs. This small trick makes a huge difference because the right texture helps the pumpkin balls stay firm after chilling. - Chill the Mixture
Cover the bowl with plastic wrap and place it into the refrigerator for about 30 to 45 minutes. This step is important because cold filling becomes easier to roll into smooth balls. When the mixture is chilled properly, it feels thicker and less sticky. While waiting, prepare a baking tray lined with parchment paper. You can also melt the chocolate during this time. The chilled mixture should feel soft and creamy but still hold its shape when scooped. If the filling still feels sticky after chilling, add another spoon of graham cracker crumbs. Do not skip this chilling step because warm filling can become messy very quickly. - Roll the Pumpkin Balls
Use a small cookie scoop or spoon to scoop equal portions of the chilled pumpkin mixture. Roll each piece gently between your hands until smooth and round. Try not to squeeze too hard because that can make the balls uneven or sticky. Place each pumpkin ball onto the lined tray with a little space between them. The texture should feel soft, creamy, and slightly chewy. Once all the balls are rolled, place the tray back into the refrigerator for another 20 minutes. This helps them stay firm during the chocolate coating step. - Coat and Decorate
Melt the white chocolate chips with coconut oil until smooth and glossy. Dip each chilled pumpkin ball into the melted chocolate using a fork or spoon. Let the extra chocolate drip off slowly before placing the ball back onto the tray. Sprinkle crushed cookies, cinnamon sugar, or chopped nuts on top before the chocolate hardens. The finished pumpkin balls should look smooth, creamy, and bakery-style with a beautiful shiny coating. Chill again until the chocolate sets fully. Once cold, the center becomes soft and creamy while the outside stays slightly firm and sweet
Notes
- Chill the mixture before rolling because cold filling is easier to shape into smooth balls.
- Add graham cracker crumbs slowly so the mixture does not become too dry.