You know that feeling when you crave something crunchy… but also gooey and chocolatey at the same time?
Most desserts give you only one thing.
Either soft cake or crispy snacks… but not both together.
And sometimes, you try recipes that look amazing online but turn out disappointing.
Too dry. Too hard. Or just not like the picture.
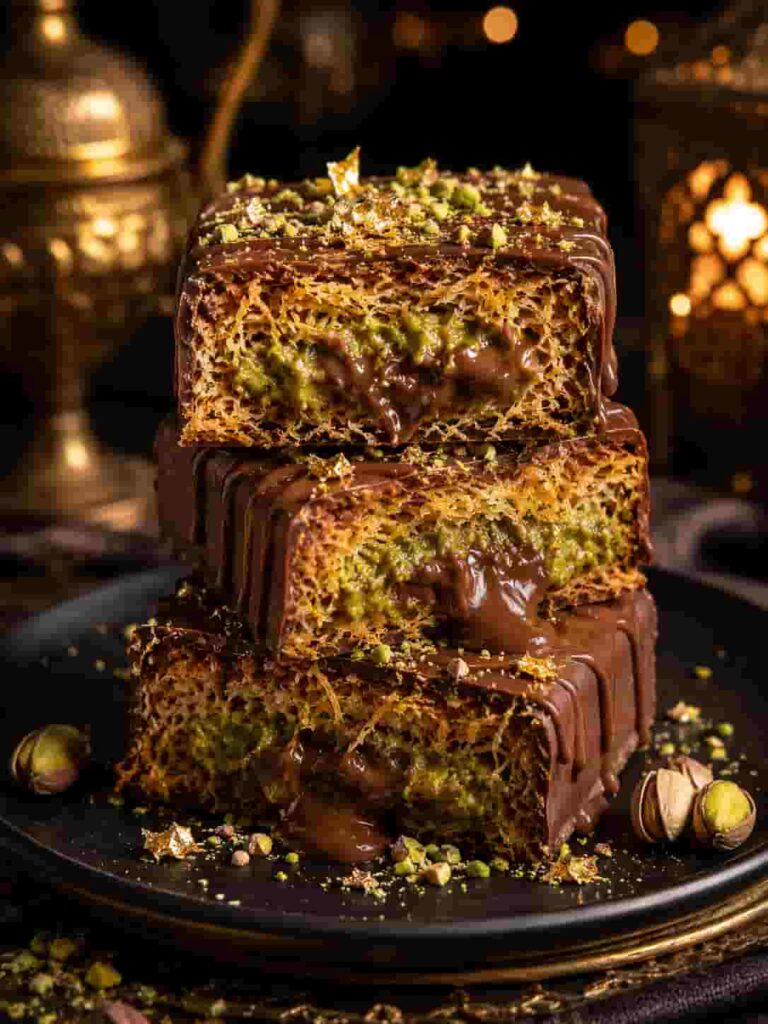
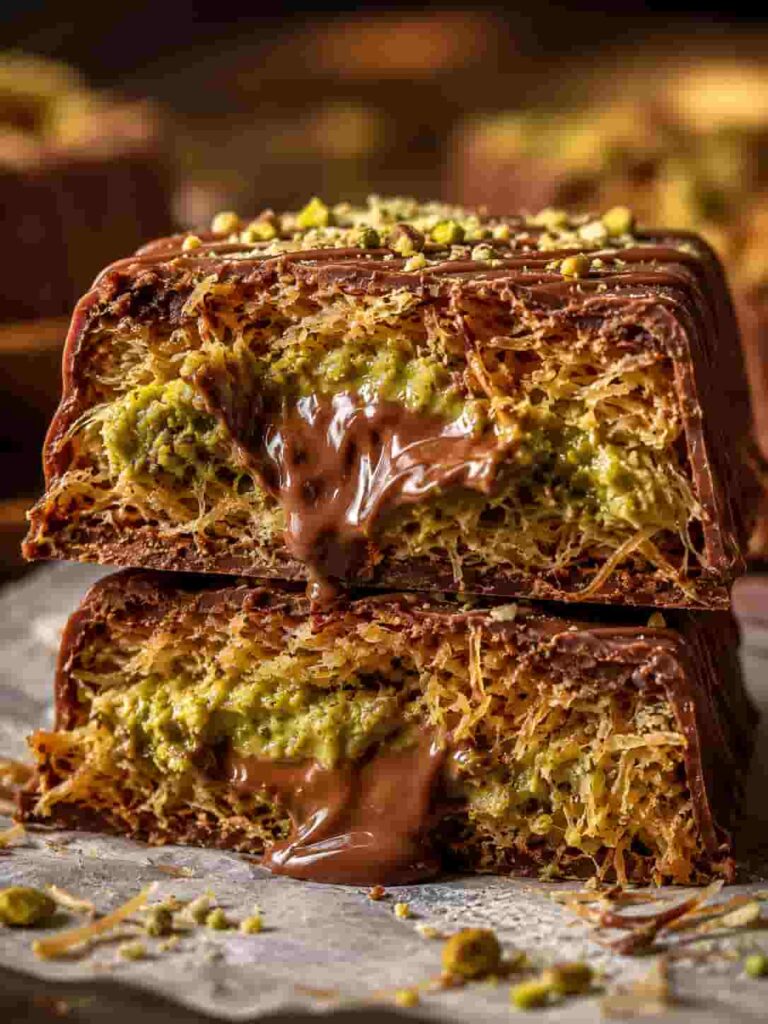
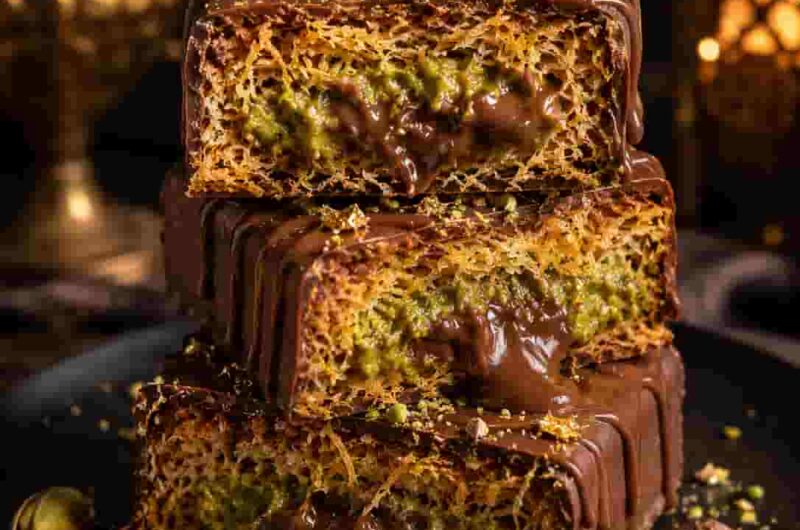
But this kunafa chocolate bar is different.
It gives you crispy golden layers on the outside.
And warm, melted chocolate on the inside.
Every bite feels like a luxury dessert shop treat… made right in your kitchen.
And the best part? It is actually simple.
No stress. No fancy chef skills needed.
Just pure dessert happiness in every bite.
WHAT IS THIS RECIPE?
Kunafa chocolate bar is a modern twist on traditional Middle Eastern kunafa.
Instead of cheese or cream filling, it uses rich melted chocolate.
The outside is made from shredded kunafa pastry that turns crispy and golden when baked.
Inside, the chocolate melts into a soft, gooey center.
It is crispy, buttery, sweet, and slightly crunchy all at the same time.
Think of it like a chocolate bar wrapped in golden crispy threads.
It is perfect for parties, gifts, or personal sweet cravings.
WHY YOU WILL LOVE THIS RECIPE
- Crispy outside with gooey chocolate inside
- Easy ingredients you can find anywhere
- Taste like a fancy dessert shop treat
- Perfect for sharing with family and friends
- Quick to prepare with simple steps
- Customizable with different chocolate flavors
- Looks impressive but super easy to make
Here’s where most people get this wrong… they don’t toast the kunafa properly, so it stays soft instead of crispy.
INGREDIENTS
- 200g kunafa dough (shredded pastry) – This is the base that becomes crispy and golden when baked.
- 100g melted butter – Helps the kunafa turn golden and crunchy.
- 200g milk chocolate or dark chocolate – The gooey filling that melts beautifully inside.
- 2 tablespoons sugar – Adds light sweetness to balance flavor.
- 1 teaspoon vanilla extract – Enhances chocolate flavor.
- 2 tablespoons condensed milk (optional) – Makes filling extra creamy and rich.
- Chopped nuts (optional) – Pistachios or almonds for crunch and flavor.
Tip: Always use good quality chocolate because it is the star of this recipe.
HOW TO MAKE (STEP-BY-STEP)
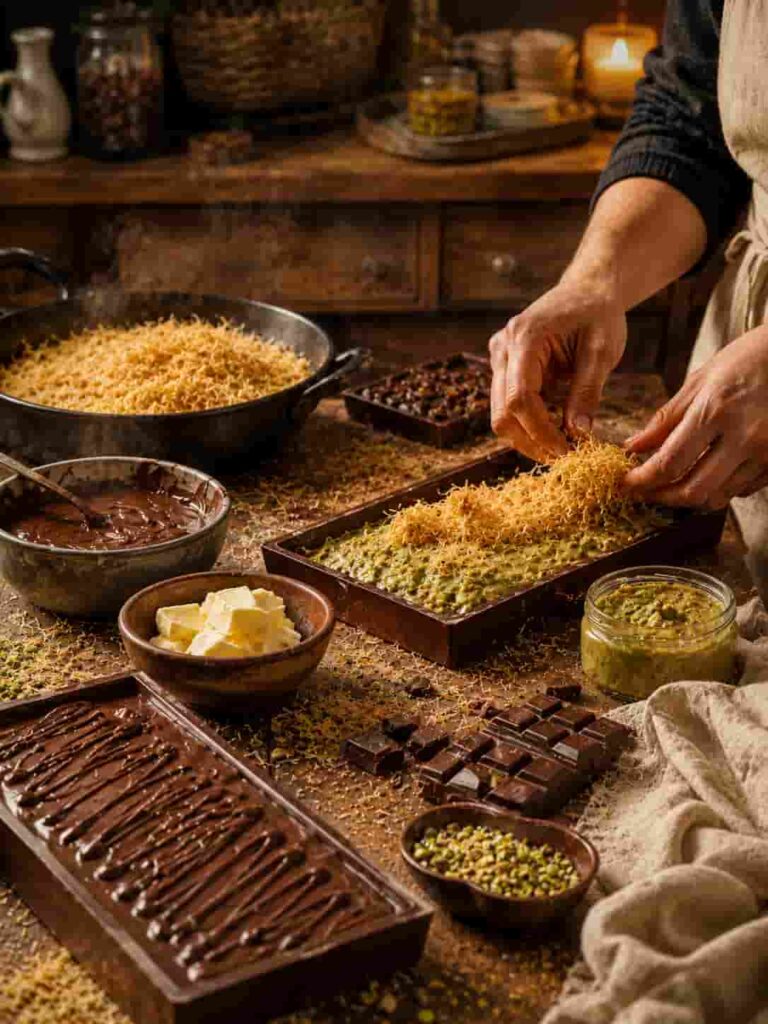
1. Prepare the kunafa base
Start by preheating your oven to 180°C (350°F). Take shredded kunafa dough and gently separate it using your fingers. Make sure it is soft and fluffy, not clumped together. Pour melted butter over it and mix well until every strand is coated. It should look evenly glossy and slightly wet. Add sugar and mix again. This helps create a sweet golden crust. The kunafa should feel soft but slightly sticky. Spread half of it into a baking tray and press gently to form a base layer. This will be the crunchy bottom of your chocolate bar.
2. Add chocolate filling
Melt your chocolate in a bowl until smooth, thick, and creamy. You can use microwave or double boiler. Add vanilla and condensed milk if using. Stir until it becomes silky and shiny. Pour this melted chocolate over the kunafa base. Spread evenly so every bite has chocolate. If you want extra texture, sprinkle chopped nuts on top. The filling should look rich, glossy, and thick. Do not overfill or it may overflow while baking.
3. Top and bake
Cover the chocolate layer with remaining kunafa. Press gently so everything holds together. Make sure the top layer is loose and fluffy for crispiness. Bake for 25–30 minutes until the top turns golden brown and crispy. The smell will be buttery, sweet, and chocolatey. Once baked, let it cool for 10–15 minutes. Then cut into bars or squares. The inside will be soft, warm, and gooey while the outside stays crispy.
This small trick makes a huge difference… letting it rest before cutting keeps the layers clean and perfect.
PRO TIPS
- Always use melted butter evenly for crispy texture
- Do not skip pressing the base lightly for structure
- Use high-quality chocolate for best melt and taste
- Bake until golden, not pale, for crunchiness
- Let it rest before cutting for clean layers
- Add nuts for extra crunch and flavor depth
- Do not overfill chocolate or it may leak
- Use fresh kunafa dough for better crisp results
- Serve warm for best gooey texture
COMMON MISTAKES TO AVOID
Using dry kunafa without butter makes it hard and uneven. Overbaking makes chocolate dry and bitter. Not separating kunafa strands causes clumps. Using low-quality chocolate affects taste. Skipping rest time ruins structure. Adding too much filling causes overflow. Pressing too hard removes crispiness. Not preheating oven affects baking. Using cold butter makes uneven coating. Cutting too early makes mess. Uneven layers cause imbalance. Skipping sugar reduces flavor balance.
VARIATIONS / CUSTOMIZATION IDEAS
Now let’s make it even better…
- White chocolate version – Use creamy white chocolate filling
- Nutella twist – Replace chocolate with Nutella spread
- Pistachio kunafa – Add pistachio cream for luxury flavor
- Vegan version – Use plant-based butter and vegan chocolate
- Extra crispy – Bake longer for stronger crunch
SERVING IDEAS
Serve warm with vanilla ice cream.
Drizzle with extra melted chocolate on top.
Serve with Arabic coffee or tea.
Cut into small bars for parties.
STORAGE & REHEATING
Store in airtight container for 2–3 days.
Keep at room temperature for short time or refrigerate.
Reheat in oven for 5–7 minutes to restore crispiness.
Avoid microwaving too long or it may turn soft.
NUTRITION FACTS (Approximate)
- Calories: 320 per bar
- Carbs: 35g
- Fat: 18g
- Protein: 5g
QUICK SUMMARY
- Crispy kunafa chocolate dessert bars
- Gooey melted chocolate filling
- Easy homemade Middle Eastern inspired treat
- Perfect for parties and sweet cravings
WHEN TO EAT THIS
Perfect for evening dessert cravings.
Great for weekend family gatherings.
Ideal after dinner as a sweet treat.
And honestly… perfect for late-night chocolate cravings too.
Every bite is crispy, warm, and deeply satisfying.
This Kunafa Chocolate Bar Recipe Is Crunchy, Gooey, and Totally Addictive
Course: bars4
servings30
minutes40
minutes300
kcalIngredients
200g kunafa dough (shredded pastry) – This is the base that becomes crispy and golden when baked.
100g melted butter – Helps the kunafa turn golden and crunchy.
200g milk chocolate or dark chocolate – The gooey filling that melts beautifully inside.
2 tablespoons sugar – Adds light sweetness to balance flavor.
1 teaspoon vanilla extract – Enhances chocolate flavor.
2 tablespoons condensed milk (optional) – Makes filling extra creamy and rich.
Chopped nuts (optional) – Pistachios or almonds for crunch and flavor.
Directions
- Prepare the kunafa base
Start by preheating your oven to 180°C (350°F). Take shredded kunafa dough and gently separate it using your fingers. Make sure it is soft and fluffy, not clumped together. Pour melted butter over it and mix well until every strand is coated. It should look evenly glossy and slightly wet. Add sugar and mix again. This helps create a sweet golden crust. The kunafa should feel soft but slightly sticky. Spread half of it into a baking tray and press gently to form a base layer. This will be the crunchy bottom of your chocolate bar. - Add chocolate filling
Melt your chocolate in a bowl until smooth, thick, and creamy. You can use microwave or double boiler. Add vanilla and condensed milk if using. Stir until it becomes silky and shiny. Pour this melted chocolate over the kunafa base. Spread evenly so every bite has chocolate. If you want extra texture, sprinkle chopped nuts on top. The filling should look rich, glossy, and thick. Do not overfill or it may overflow while baking. - Top and bake
Cover the chocolate layer with remaining kunafa. Press gently so everything holds together. Make sure the top layer is loose and fluffy for crispiness. Bake for 25–30 minutes until the top turns golden brown and crispy. The smell will be buttery, sweet, and chocolatey. Once baked, let it cool for 10–15 minutes. Then cut into bars or squares. The inside will be soft, warm, and gooey while the outside stays crispy.
This small trick makes a huge difference… letting it rest before cutting keeps the layers clean and perfect.
Notes
- Always use melted butter evenly for crispy texture
- Bake until golden, not pale, for crunchiness