You know that craving…
Something sweet, rich, and just a little salty.
But most desserts take too long or feel too heavy.
And sometimes, they just don’t hit that perfect balance.
That’s where this genius salted caramel dessert changes everything.
It’s creamy, smooth, and packed with deep caramel flavor.
You don’t need fancy skills or hours in the kitchen.
Just a few simple steps… and you get a dessert that feels like a treat from a bakery.
WHAT IS THIS RECIPE?
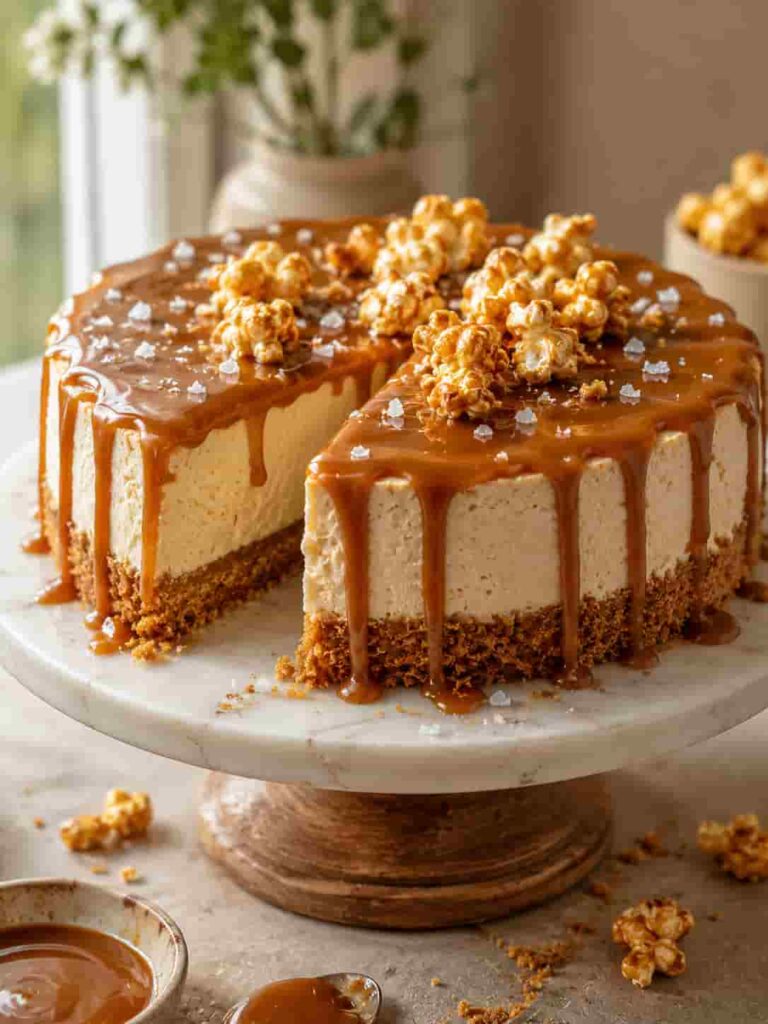
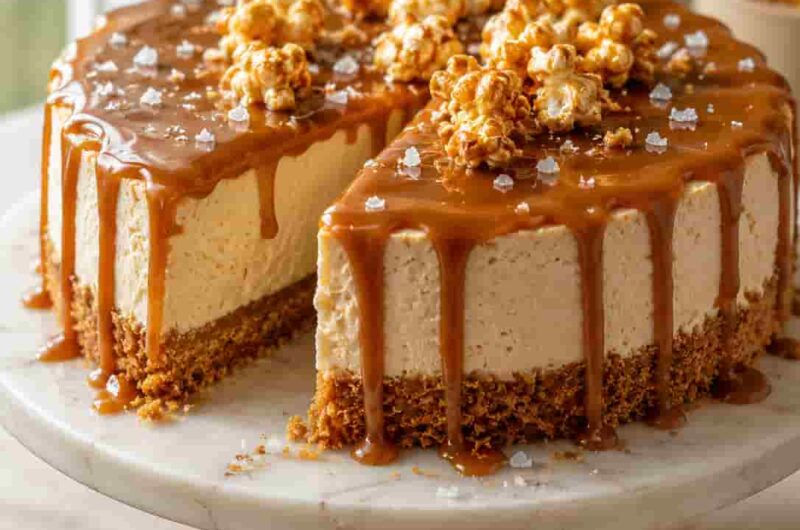
This is a simple layered salted caramel dessert.
It has a buttery base, a smooth creamy layer, and a rich salted caramel topping.
Each bite is soft, slightly sweet, and perfectly balanced with a hint of salt.
It feels fancy, but it’s actually very easy to make at home.
Perfect for when you want something impressive without stress.
WHY YOU WILL LOVE THIS RECIPE
- Quick and easy – no complicated baking steps
- Perfect sweet and salty balance
- Uses simple, affordable ingredients
- Creamy, smooth texture in every bite
- Great for family, guests, or cravings
- Can be made ahead of time
- Looks beautiful without extra effort
Here’s where most people get this wrong… they overcook the caramel and make it bitter.
INGREDIENTS
- 1 cup crushed biscuits – This forms the base. Use digestive biscuits or any plain cookies. Crush them finely for a smooth layer.
- 1/2 cup melted butter – Helps bind the base together and adds rich flavor.
- 1 cup heavy cream – Gives the dessert its creamy texture. Use full-fat for best results.
- 1/2 cup cream cheese – Adds slight tang and thickness. Let it soften before mixing.
- 1/3 cup powdered sugar – Sweetens the creamy layer without making it grainy.
- 1 teaspoon vanilla extract – Enhances overall flavor and adds warmth.
- 1 cup sugar (for caramel) – This will melt and turn golden for the topping.
- 2 tablespoons butter (for caramel) – Adds richness and shine.
- 1/2 cup cream (for caramel) – Makes the caramel smooth and pourable.
- 1/2 teaspoon salt – The key ingredient for that perfect salted caramel taste.
Tip: You can use store-bought caramel if you’re short on time.
HOW TO MAKE (STEP-BY-STEP)
1. Prepare the base
Start by mixing crushed biscuits with melted butter in a bowl. Stir until the texture feels like wet sand. Press this mixture into the bottom of a tray or dish. Use the back of a spoon to press it firmly and evenly. This helps create a strong base that won’t fall apart. Chill it in the fridge for 15–20 minutes. The base should feel firm and slightly cold when ready. This step is simple but important for structure. Take your time to press it evenly.
2. Make the creamy layer
In a bowl, beat the cream cheese until smooth and lump-free. Add powdered sugar and vanilla extract. Mix until creamy and soft. Now pour in the heavy cream and whip until thick and fluffy. The mixture should look light, smooth, and slightly airy. Spread this layer evenly over the chilled base. Use a spatula to smooth the top. It should look clean and even. Place it back in the fridge while you prepare the caramel.
3. Make the salted caramel and assemble
In a pan, heat sugar on medium flame until it melts and turns golden brown. Stir gently to avoid burning. Once melted, add butter and mix quickly. Slowly pour in cream while stirring. Be careful as it may bubble. Add salt and mix until smooth. Let it cool slightly until thick but still pourable. Pour it over the creamy layer evenly. Chill the dessert for at least 2 hours before serving. The top should look glossy and rich.
This small trick makes a huge difference… adding salt at the end keeps the flavor balanced and not too strong.
PRO TIPS
- Always melt sugar slowly to avoid burning and bitterness.
- Use room temperature cream cheese for a smooth texture.
- Chill each layer properly for better structure.
- Don’t rush caramel—patience gives best flavor.
- Use a spatula to spread layers evenly.
- Taste caramel before pouring to adjust salt level.
- Use full-fat cream for richer results.
- Let dessert chill fully before cutting.
- Add a pinch of sea salt on top for extra flavor.
COMMON MISTAKES TO AVOID
Burning the sugar makes caramel bitter. Using cold cream cheese causes lumps. Skipping chilling time makes layers messy. Adding cream too fast can split caramel. Not stirring properly leads to uneven texture. Using low-fat cream affects richness. Not pressing the base firmly makes it crumbly. Overmixing cream can make it too thick. Pouring hot caramel can melt layers. Not measuring ingredients correctly changes texture. Using too much salt overpowers sweetness. Cutting too early ruins presentation.
VARIATIONS / CUSTOMIZATION IDEAS
Now let’s make it even better…
- High protein version – Add Greek yogurt to the creamy layer.
- Vegan version – Use coconut cream and dairy-free butter.
- Quick version – Use ready caramel sauce.
- Chocolate twist – Add a chocolate layer between base and cream.
- Nutty crunch – Sprinkle chopped nuts on top.
SERVING IDEAS
Serve chilled for the best texture.
Pair with coffee or tea for a cozy treat.
Top with whipped cream for extra indulgence.
Perfect for parties or family dinners.
STORAGE & REHEATING
Store in the fridge for up to 4 days in an airtight container.
Do not freeze as it may affect texture.
Serve cold or let sit at room temperature for a few minutes before eating.
NUTRITION FACTS (Approximate)
- Calories: 250 per serving
- Carbs: 30g
- Fat: 14g
- Protein: 3g
QUICK SUMMARY
- Easy no-fuss dessert with rich caramel flavor
- Creamy, smooth, and perfectly balanced
- Simple ingredients and beginner-friendly
- Great for any occasion
WHEN TO EAT THIS
Perfect for busy days when you want a quick sweet fix.
Great after meals when you need a light dessert.
Ideal for snack cravings in the evening.
And honestly… perfect for late-night indulgence.
One bite, and you’ll keep coming back for more.
Genius Salted Caramel Dessert You Can Make in Minutes
Course: Dessert4
servings30
minutes40
minutes300
kcalIngredients
1 cup crushed biscuits – This forms the base. Use digestive biscuits or any plain cookies. Crush them finely for a smooth layer.
1/2 cup melted butter – Helps bind the base together and adds rich flavor.
1 cup heavy cream – Gives the dessert its creamy texture. Use full-fat for best results.
1/2 cup cream cheese – Adds slight tang and thickness. Let it soften before mixing.
1/3 cup powdered sugar – Sweetens the creamy layer without making it grainy.
1 teaspoon vanilla extract – Enhances overall flavor and adds warmth.
1 cup sugar (for caramel) – This will melt and turn golden for the topping.
2 tablespoons butter (for caramel) – Adds richness and shine.
1/2 cup cream (for caramel) – Makes the caramel smooth and pourable.
1/2 teaspoon salt – The key ingredient for that perfect salted caramel taste.
Directions
- Prepare the base
Start by mixing crushed biscuits with melted butter in a bowl. Stir until the texture feels like wet sand. Press this mixture into the bottom of a tray or dish. Use the back of a spoon to press it firmly and evenly. This helps create a strong base that won’t fall apart. Chill it in the fridge for 15–20 minutes. The base should feel firm and slightly cold when ready. This step is simple but important for structure. Take your time to press it evenly. - Make the creamy layer
In a bowl, beat the cream cheese until smooth and lump-free. Add powdered sugar and vanilla extract. Mix until creamy and soft. Now pour in the heavy cream and whip until thick and fluffy. The mixture should look light, smooth, and slightly airy. Spread this layer evenly over the chilled base. Use a spatula to smooth the top. It should look clean and even. Place it back in the fridge while you prepare the caramel. - Make the salted caramel and assemble
In a pan, heat sugar on medium flame until it melts and turns golden brown. Stir gently to avoid burning. Once melted, add butter and mix quickly. Slowly pour in cream while stirring. Be careful as it may bubble. Add salt and mix until smooth. Let it cool slightly until thick but still pourable. Pour it over the creamy layer evenly. Chill the dessert for at least 2 hours before serving. The top should look glossy and rich.
Notes
- Always melt sugar slowly to avoid burning and bitterness.
- Chill each layer properly for better structure.